1. Setting up the AWS infrastructure:
This article introduces you to provisioning the AWS infrastructure in order to deploy and run WordPress on AWS. By the end of this arcticle, you will be familiar with creating and EC2 and RDS instances, and the choices you need to make for configuring them for your own deployments. You will also see the limitations of the first deployed architecture, that we will improve in the next labs by introducing new AWS services, thus you will really learn by practice. We will automate the entire process, and add some security layers for this architecture. So let’s begin.
2. The AWS cloud deployment architecture:
Before we start, we need to have the deployment architecture in place. The term deployment architecture here describes the manner in which a set of resources like the web server, the application server, databases, DNS servers, load balancers, or any other specific AWS resources are configured on the network to fulfil the system requirements (and ultimately satisfy the business goals). The following diagram shows a simple AWS deployment architecture for WordPress web application. 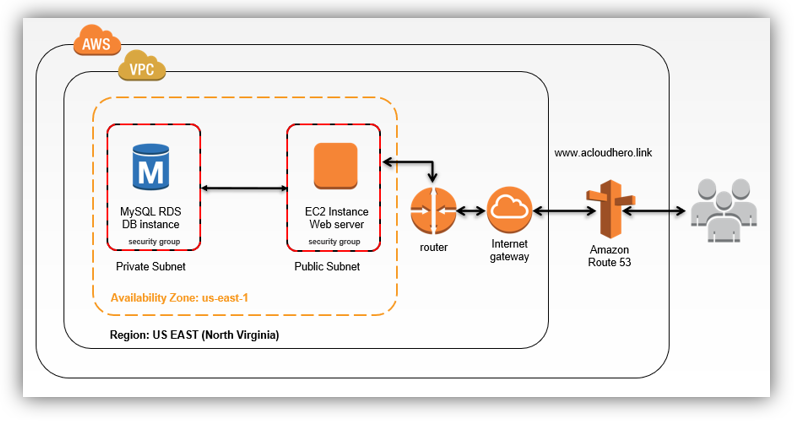
3. Introducing AWS services used on this lab:
First of all, let’s get familiar with the AWS terms in the previous diagram:
- Region: AWS services are hosted in multiple locations around the world, we call them “regions”.
- Availability Zone: like traditional data centers within a region.
- EC2 Instance: a virtual server on which you run your applications.
- Amazon Relational Database Service (RDS): Amazon RDS is a fully-managed SQL database service. It is nothing but an EC2 instance running a SQL engine of your choice. MySQL, PostgreSQL, Oracle, Microsoft SQL Server, and Amazon Aurora.
- Security Groups: A security group acts as a virtual firewall for your instance in order to control inbound and outbound traffic.
- Virtual Private Cloud (VPC): VPC lets you provision a private, isolated section of the AWS cloud where you can launch AWS resources in a virtual network, using custom-defined IP address ranges. It is like your own private data centre.
- Subnets: logical segments of a VPC’s address range that allow you to designate to a group of your resources based on security and operational needs.
- Router: Each VPC comes with a default router in order to communicate with resources outside the VPC.
- Internet gateway: Each VPC also comes with a default Internet gateway to connect to the public Internet.
Let’s now begin setting up the required resources.
4. Preparing the AWS infrastructure:
-
Configuring subnets:
For this lab, I will use the default VPC in us east-1 region (N.Virginia) , the default CIDR for this VPC is: 172.31.0.0/16. I will create two new subnets as follow:
- Private subnet that is located in us-east-1a availability zone and has this ipv4 block: 172.31.96.0/20
- Public subnet that is located in us-east-1a availability zone and has this ipv4 block: 172.31.112.0/20
From the VPC dashboard, make sure you are in N.Virginia region, and in the left menu, clic on “Subnets”then click on “Create subnet” 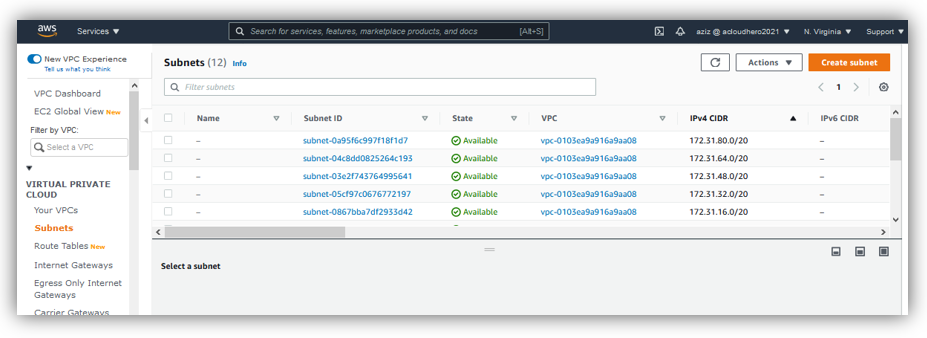 Choose your default VPC,
 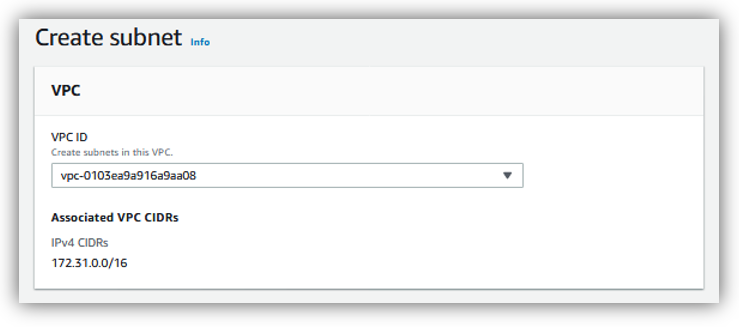 Add the following:
- Subnet name: Private-1a
- Availability Zone: US East (N.Virginia) / us-east-1a
- IPv4 CIDR block: 172.31.96.0/20
Then click on “Add new subnet” 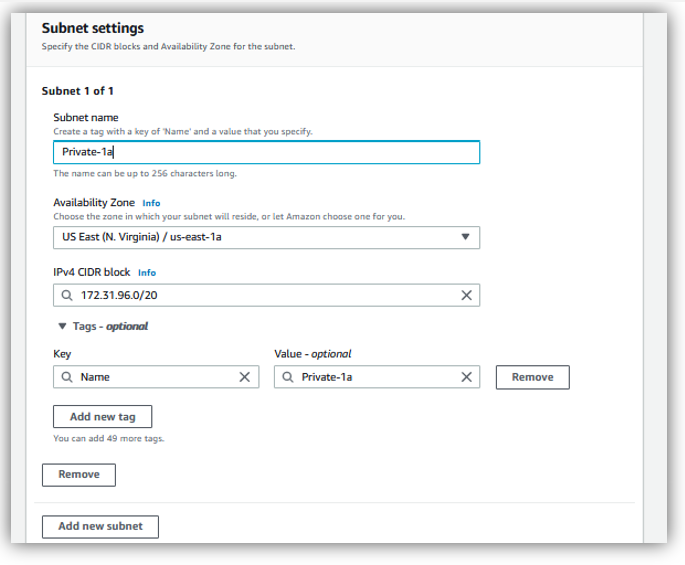 For the second subnet, add the following details then click on “Create subnet”:
- Subnet name: Public-1a
- Availability Zone: US East (N.Virginia) / us-east-1
- IPv4 CIDR block: 172.31.112.0/20
 The two subnets are created correctly, now select “Public subnet” then click on “Action” then choose “Modify auto-assign IP settings”
 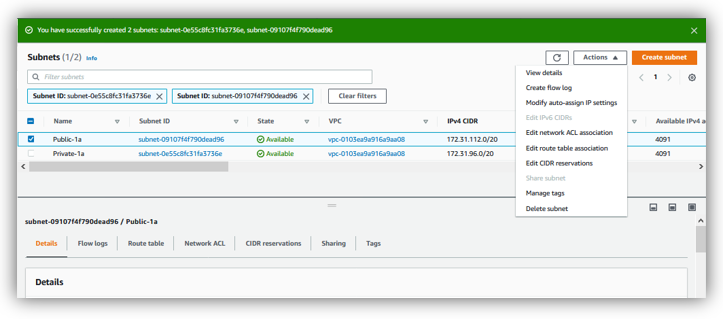 Select “Enable auto-assign public IPv4 adress” then click on Save
 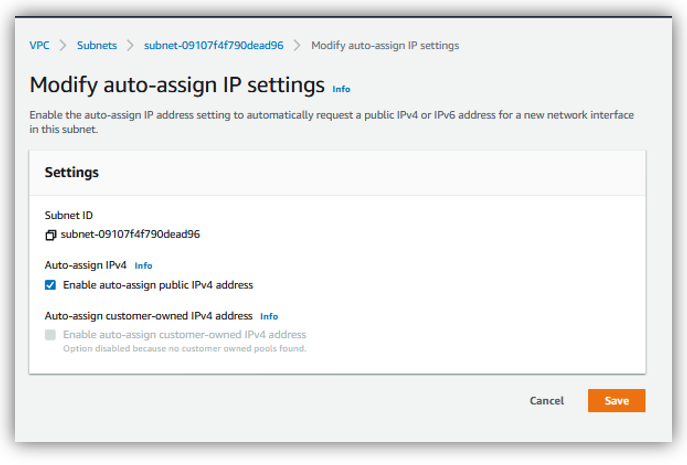 Now, I will prepare a 2nd private subnet that will be hosted in another Availability Zone other than us-east-1a, this subnet will be used later for RDS Database instance: Choose one of the subnets created by default, for me, I have chosen:
- IPv4 CIDR: 172.31.80.0/20 in us-east-1b Availibitly Zone
- Give it a name: Private-1b
Then, select the subnet, and make it private by clicking on Action / Modify auto-assign IP settings: 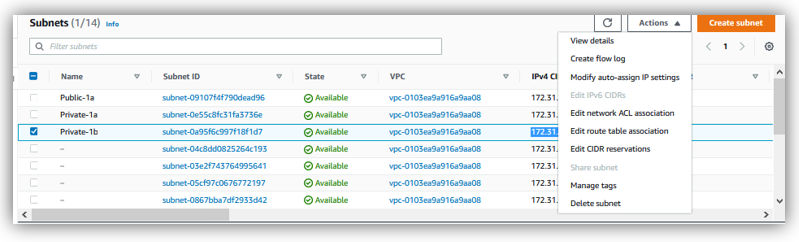 Unselect “Enable auto-assing public IPv4 address”, then click on “Save”:
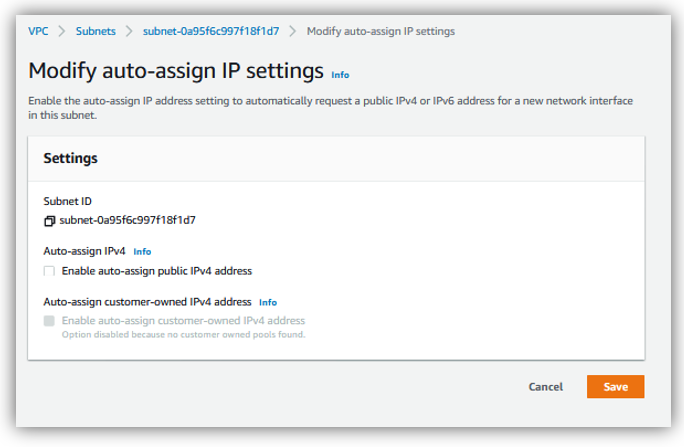
-
Configuring Security Groups:
For this lab, we will be using two security groups: Web-Access that will define rules (inbound/outbound) for our web server, and DB-Access, that will define rules (inbound/outbound) for RDS Mysql Database instance. From the EC2 dashboard, make sure you are in N.Virginia region, and in the left menu, click on “Network & Security” / “Security Groups”, then click on “Create security group” 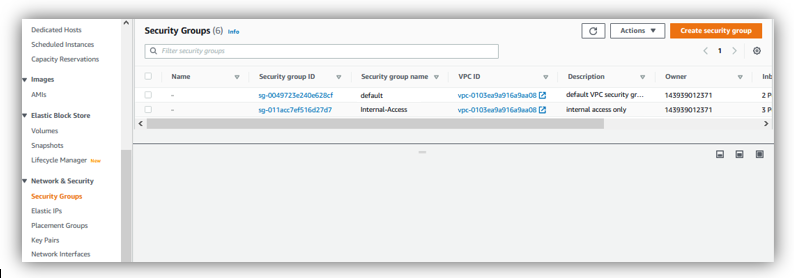 Add the following details:
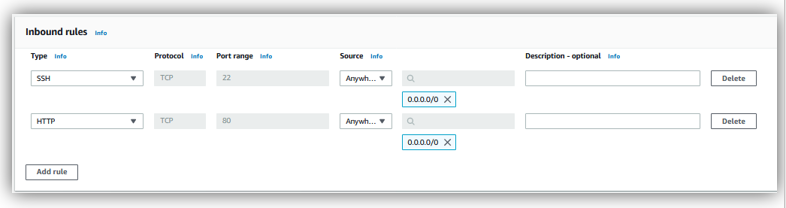
- Security group name: Web-Access
- Description: Allow SSH and HTTP. For learning purpose, we can allow to connect to web server on SSH, but in production environnement, it is recommanded to use a bastion host.
- VPC: choose the default VPC.
- Add a first inbound rule:
- Type: SSH
- Protocol: TCP
- Port Range:22
- Source: 0.0.0.0/0
- Add a second inbound rule:
- Type: http
- Protocol: TCP
- Port Range:80
- Source: 0.0.0.0/0
 Then click on “Create Security Group” Add now a second Security Group like this:
- Security group name: Database-Access
- Description: Allow Mysql from Webserver. VPC: choose the default VPC.
- Add an inbound rule:
- Type: MySQL/Aurora
- Protocol: TCP
- Port Range:3306
- Source: choose the Web-Access security group
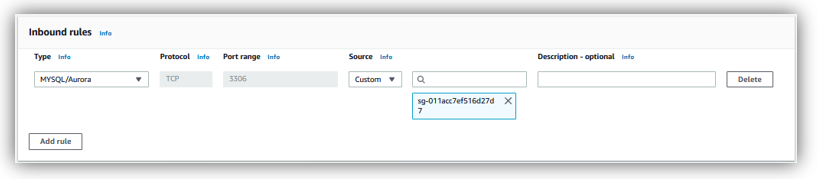
Then click on “Create Security Group”
-
Configuring Subnet groups:
On RDS dashboard, and in the left menu, click on “Sbunet groups”, then click on “Create DB Subnet Group”  Add the following details:
- Name: rds-db-subnet-group
- VPC: choose your default VPC or the one you are planning to use.
Below “Add subnets”, select these two Availability Zones: us-east-1a and us-east-1b and add these two private subnets: 172.31.96.0/20 and 172.31.80.0/20 Then click on “Create” 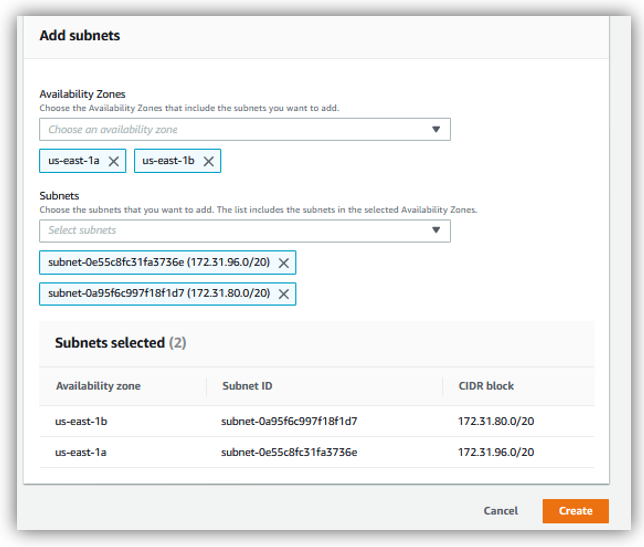
5. Launching EC2 instance: Webserver
On the EC2 dashboard, click on “Launch instances”  For this lab, we will use Amazon Linux 2 AMI, click “Select”:
  After selecting an AMI image, the next option is to choose an instance type. The instance is the virtual server that will run wordpress in our case. Select the t2.micro instance that is included in the free-tier for a period of 1 year from the date you have created your AWS account. Click “Next: configure instance details”:
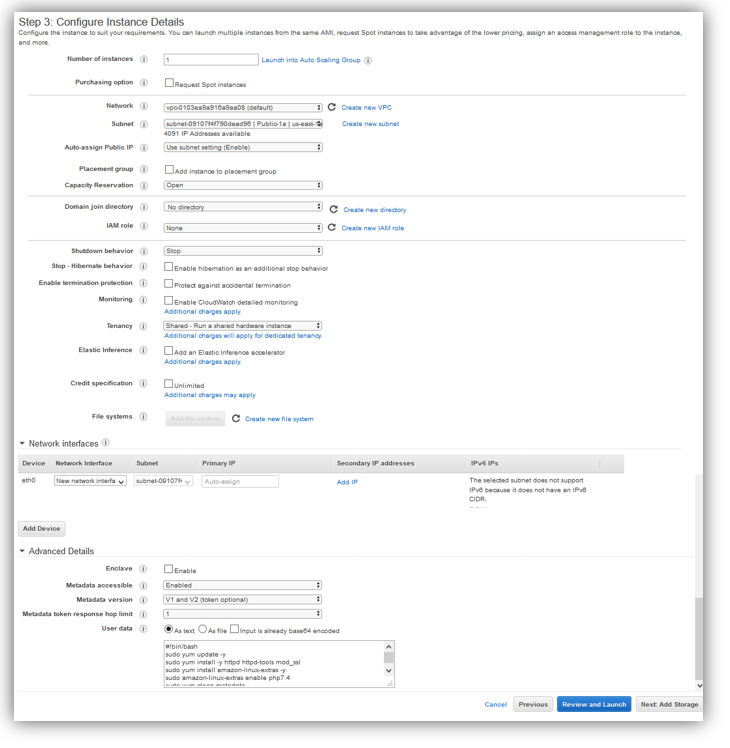
  We will keep all details provided by defaut, except for these two parameters:
- Subnet: choose “Public-1a | us-east-1”
- In “User data” field, paste script below and click on “Next: Add Storage”
#!bin/bash

sudo yum update -y

sudo yum install -y httpd httpd-tools mod_ssl

sudo yum install amazon-linux-extras -y

sudo amazon-linux-extras enable php7.4

sudo yum clean metadata

sudo yum -y install php php-common php-pear

sudo yum -y install php-cli php-pdo php-fpm php-json php-mysqlnd php-gd

sudo systemctl enable httpd

sudo systemctl restart httpd

sudo usermod -a -G apache ec2-user

sudo chmod 2775 /var/www

wget https://wordpress.org/latest.tar.gz

sudo tar -xzf latest.tar.gz

sudo cp -r wordpress/* /var/www/html/

sudo chown -R apache /var/www

sudo chgrp -R apache /var/www
This script will be executed automatically when the EC2 instance is launched, the script will:
- install httpd server
- install php and other extensions.
- Download the latest wordpress version, uncompress it and move it to web server root directory.
- Add some permissions to root web server directory…
 Leave storage settings by default, then click on “Next Add Tags”
 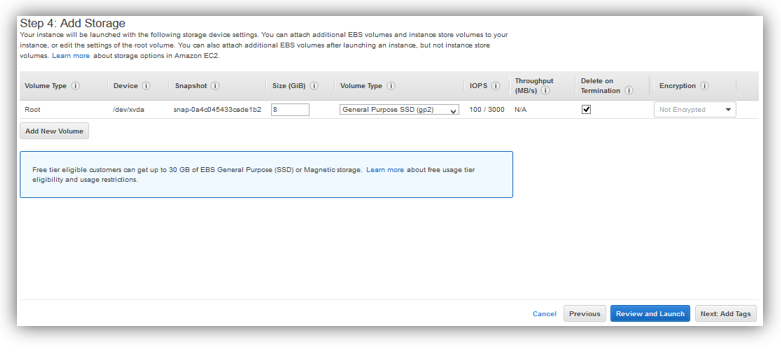 Leave Tags settings blank and click on “Next Configure Security Groups”
 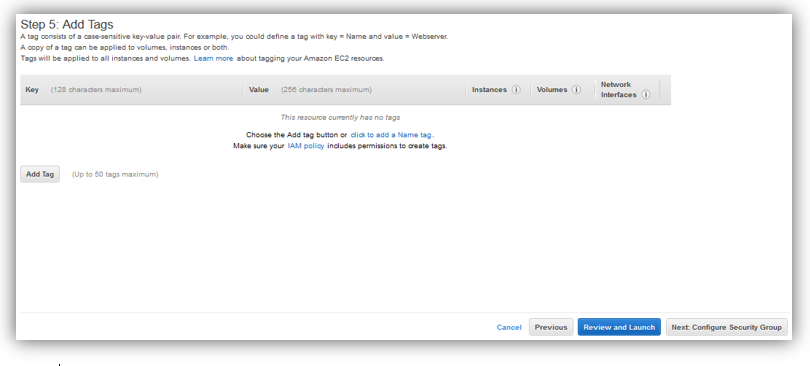 Select Web-Access security group and click on “Review and Launch”:
 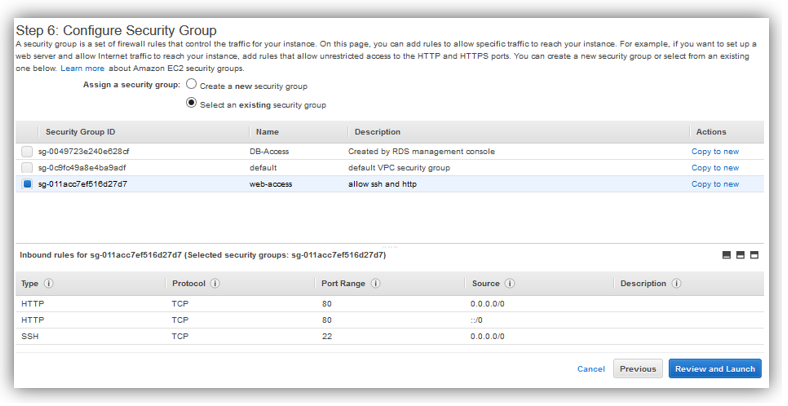 Review the configuration, then click on “Launch”
 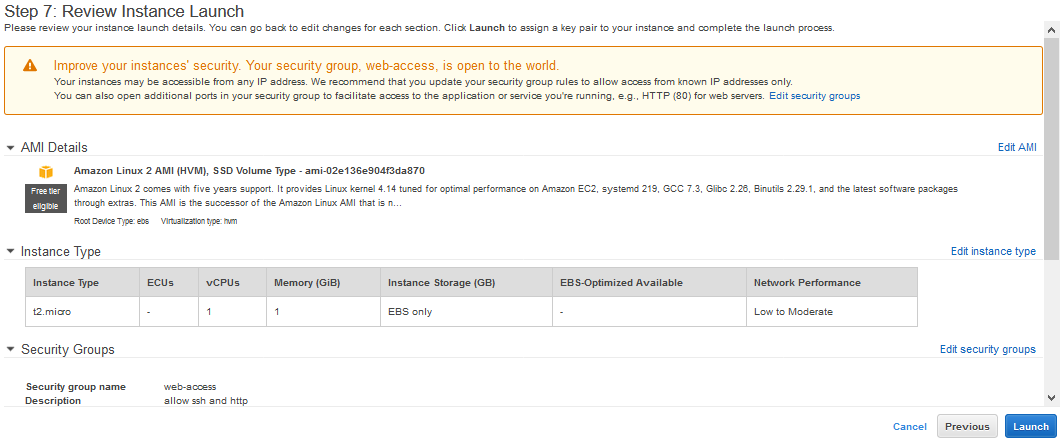 A new window displayed requesting to choose or create a new key pair that you will use later to connect to EC2 instance using SSH. Click on create new key pair, select “RSA”, give it a name, far example: “pkey-name-region”, then download it and finally click on “Launch instances”
  The instance is launching, , wait few minutes then click on the instance id link provided:
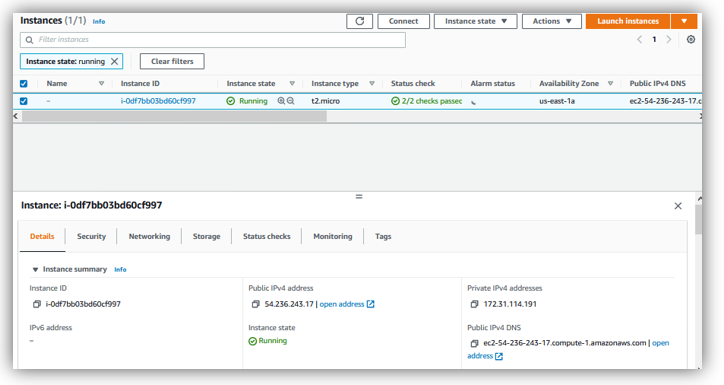
 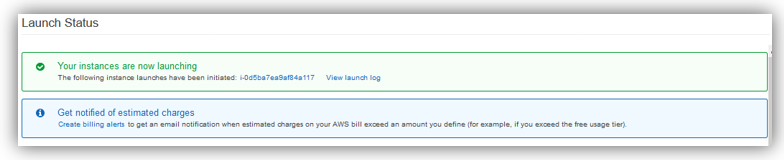 Now, the intance is launched correctly:
 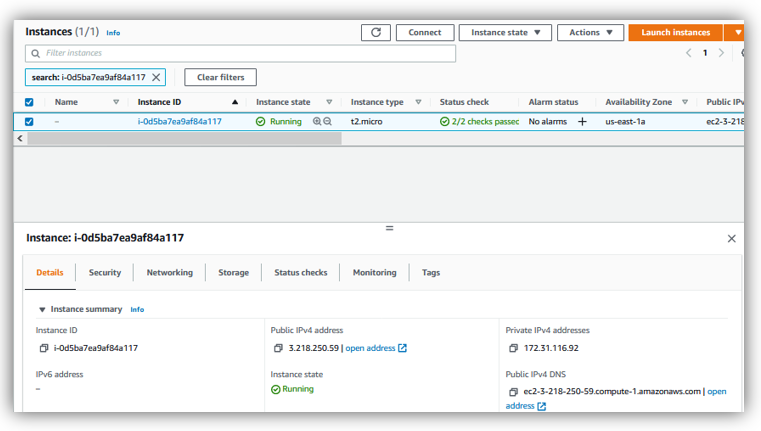 Get its public ip address, and open the link: http://3.218.250.59 , if all is ok, you will get the wordpress setup console below:
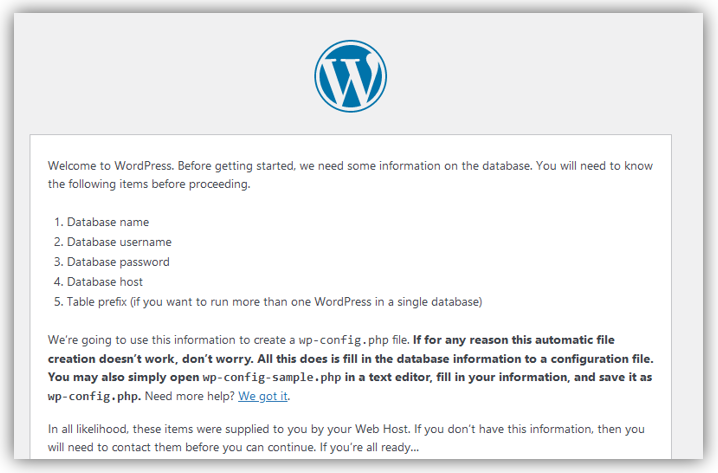
6. Launching RDS Database instance:
Open RDS dashboard, make sure you are in N.Virginia region, then click on “Create Database” 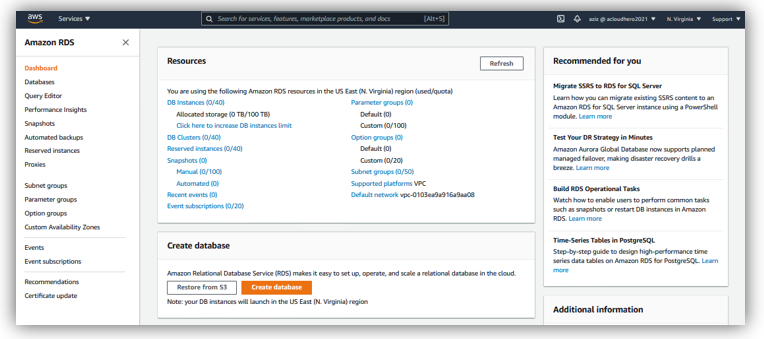 Select “Standard create” and choose MySQL.
 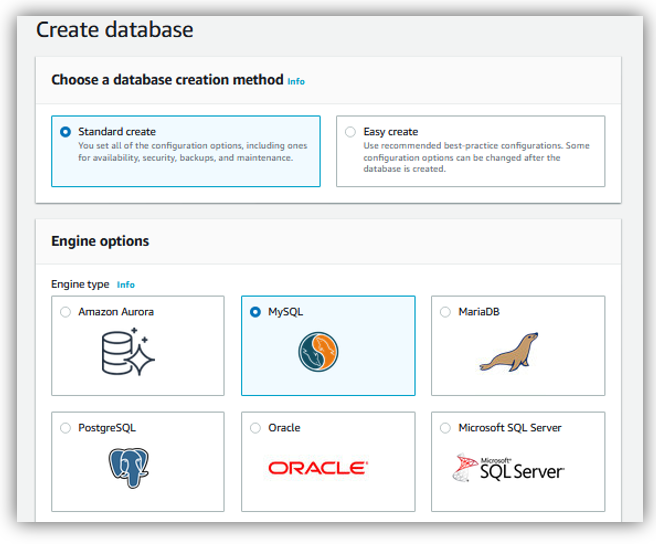 In Templates, select “Free tier” and type a name for your DB instance.
 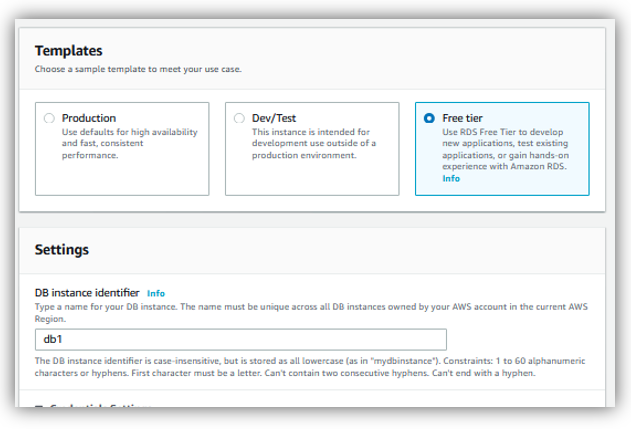 Add a master username, and password. For DB instance class, make sure you are choosing “db.t2.micro” that will not involve any charges.
 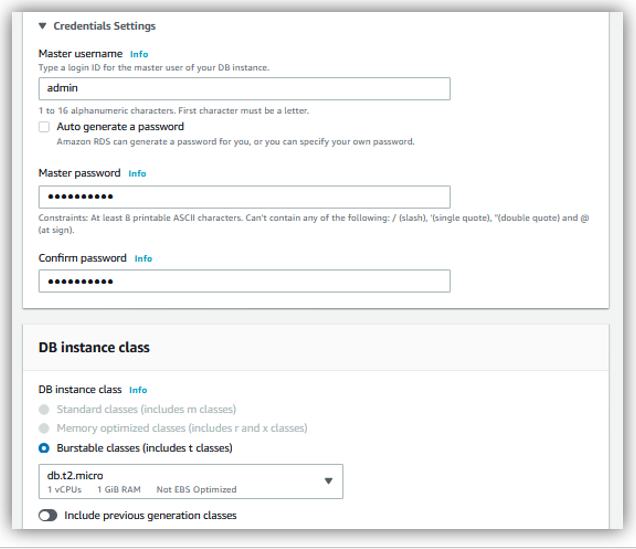 Keep the defaults parameters for Storage:
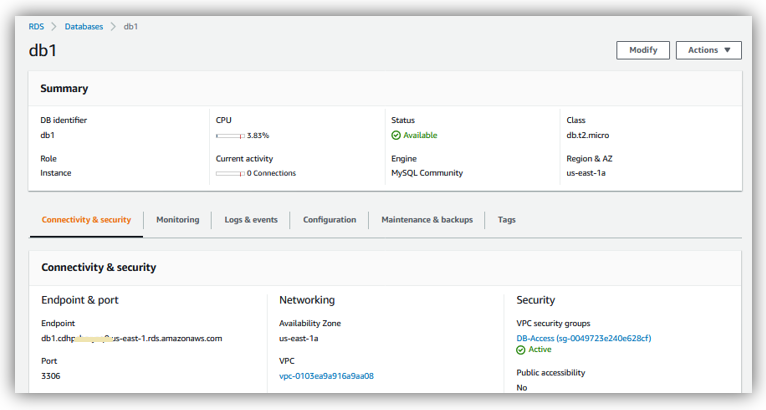
 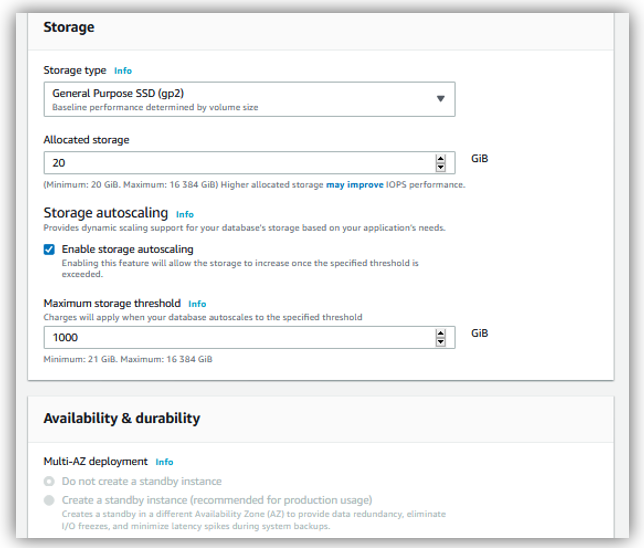 For Connectivity, choose your VPC, then choose the subnet group already created and make sure that Public access is set to no:
 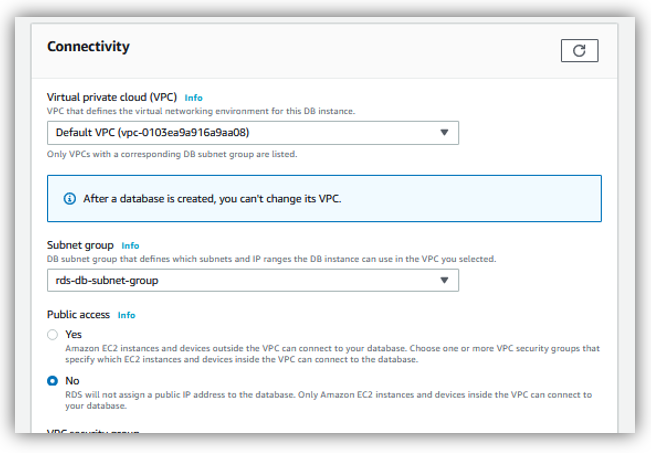 In VPC security group, select “Choosing existing”, then select the security group previously created: Database-Access In Availability Zone, select “us-east-1a”
 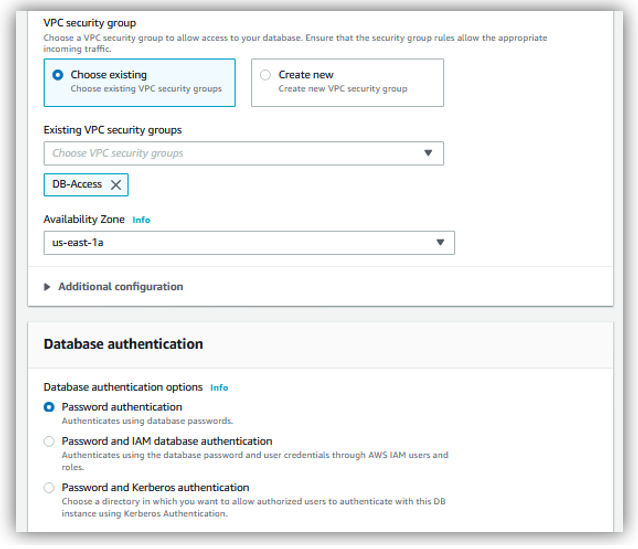 Click on Addition configuration, then type the database name and unselect “Enable automated backups”.
  Leave all other parameters by default and click on “Create database”
  Database setup will take some minutes to be fully prepared and operationnal. After a while, database status is changed to Available:
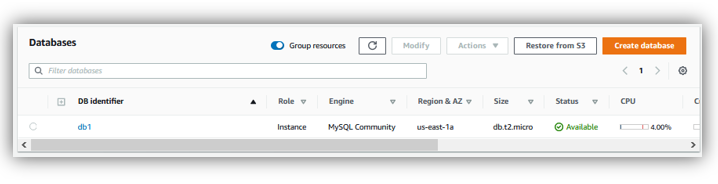
7. Configuring connection between EC2 instance and RDS Mysql Database:
For this, we are going to need these details:
- Database name: db1
- Username: admin
- Password: MyPassword
- database server: To get database server name, click on database and below, get endpoint address: db1.cdhpcbxxxxxx9.us-east-1.rds.amazonaws.com
 Now connect to EC2 instance using SSH:
- Get public ip address of EC2 instance:
- If you are using a Linux machine:
- Locate your private key file, the key used to launch my ec2 instance is: pkey-aziz-nvirginia.pem
- Ensure that the key is not publicly viewable by executing the command: chmod 400 pkey-aziz-nvirginia.pem Connect to your instance using its public ip address or public dns: Example: ssh -i pkey-aziz-nvirginia.pem [email protected]
- If you are using a Windows machine:
- First of all, you have to convert private key pem file to ppk file, to do so, download and use PuttyGen.
- Then open Putty, and add the hostname: [email protected]
 Then click on “Connection” / “SSH” / “Auth” and browse private key ppk file, then click on “Connect”
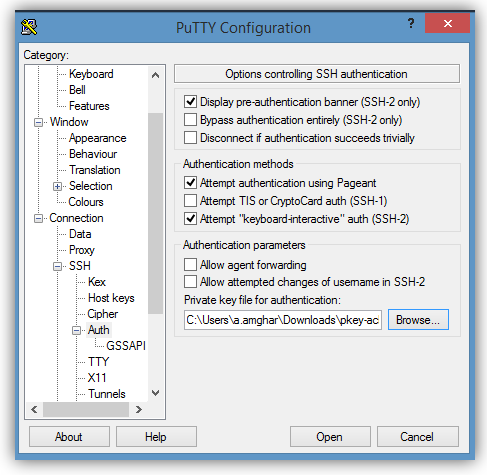
- Now, we will configure the connection to database instance:
#On SSH terminal, execute these commands:
sudo cp /var/www/html/wp-config-sample.php /var/www/html/wp-config.php
sudo nano /var/www/html/wp-config.php# On the wp-config.php, update these three values, then save the file:
‘DB_NAME’ = ‘db1’
‘DB_USER’ = ‘admin’
‘DB_PASSWORD’= ‘MyPassword’
‘DB_HOST’= ‘db1.cdhpcrxxxxxx9.us-east-1.rds.amazonaws.com’
8. Testing access to WordPress application:
You can now, just open http://ec2-instance-public-ip-address If all is ok, you will get a basic web page requesting you to add these details, then click on “Install WordPress”:  Congratulations, finally you have setup wordpress correctly, there are two links that you may use:
-
- http://ec2-instance-public-ip-address : it is the link that visitors use to open your website
- http://ec2-instance-public-ip-address/wp-admin : the admin portal allows you to manage the whole website (adding new articles, changing theme, installing new plugins..).
9. How to improve the current lab:
It’s a great lab for beginners, as it allows you to be familiar with some main AWS services using real cases, but this lab as it is now presents many risks:
- There is only one webserver, if the server crushes, the whole web site will be unreachable, and data will be lost (uploaded files, images, plugins..).
- There is only one database instance, if database crushes for some reasons, the whole web will be down, and data will be lost (users, articles, …)
- For security reasons, it is not recommanded to open SSH port on the internet of any server, instead use a bastion host.
In the next lab, we are going to correct the first point related to redundancy of web server, also, we are going to setup a bastion host in order to connect to internal servers, stay tuned.
Implementing High Availability for Wordpress on AWS - The path to be a cloud hero
[…] the previous lab “How to setup wordpress on Amazon EC2 and RDS“, you have learned by practicing some basic AWS services and functionalities, like EC2 […]
Implementing High Availability for Wordpress on AWS - Learn by practice
[…] the previous lab “How to setup wordpress on Amazon EC2 and RDS“, you have learned by practicing some basic AWS services and functionalities, like EC2 […]